¶ Overview
This page is meant to give a broad overview of optional objectives and how they relate to each other in the context of speedrunning. It is not meant as an exploration of how to complete these objectives quickly, which is more within the scope of existing and future side objective guides.
The theoretical minimum is the minimum completion time assuming you do not lose any time at all and does not factor for movement. Actual minimum is an estimate given optimal movement and execution.
If there are different variants of an objective that affect time, they will each be covered with their own subsection.

¶ Spawn variation
¶ Map Types
There are currently 3 types of map: regular, colony and megacity. All 3 are available for Automatons and Terminids, while only colonies and megacities are available for Illuminates.

¶ Mission Types
The number of optional objectives that spawn depends on both the mission and the map.
At level ![]() 10 | Super Helldive, all Automaton and Terminid missions in the 3 types of map have 5 optional objectives except for Blitz: Search and Destroy and Neutralize Orbital Defenses which have 4. The following ones have 0:
10 | Super Helldive, all Automaton and Terminid missions in the 3 types of map have 5 optional objectives except for Blitz: Search and Destroy and Neutralize Orbital Defenses which have 4. The following ones have 0:
- Defend Evacuation Site/Evacuate High Value Assets
- Eradicate Automaton Forces/Terminid Swarm
- Repel Invasion Fleet
- Retrieve Essential Personnel
¶ Illuminate's special spawn
Illuminate megacities can only spawn 3 optional objectives: Cognitive Disruptor is mandatory, and either Upload Escape Pod Data, Lidar Station, or Purge Illuminate.
Between patches 1.003.000 and 1.003.105, all Illuminate missions on both colony and megacity maps had only 3 secondary objectives. Since patch 1.003.200, colony maps once again have 5 optional objectives.
You can play these mission versions by following the guide to downpatch the game.
¶ Megacity special spawn
Regardless of the faction, there are optional objectives that cannot spawn in megacities:

For Automatons and Terminids, you can have multiple Terminate Illegal Broadcast whereas on regular and colony maps, you can only have 1.
¶ The most optimal optional objectives
You can be more flexible about optional objectives for a mutliplayer run (especially one with a longer mission complete time), however in a solo run they should be as close to the optimal ones as possible!
The following secondary objectives are good for 100% speedrunning
¶  Automatons
¶  Terminids
¶  Illuminate

The following secondary objectives are bad for 100% speedrunning (especially solo)
¶ Avoid these optional objectives

¶ Never do a speedrun with these optional objectives
These two are the slowest optional objectives, slower than most main objectives.
¶ See invisible optional objectives
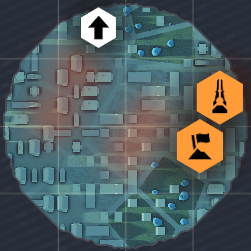
Although only 1 optional objective is displayed on the map pre-drop, there is a way to anticipate some of them.
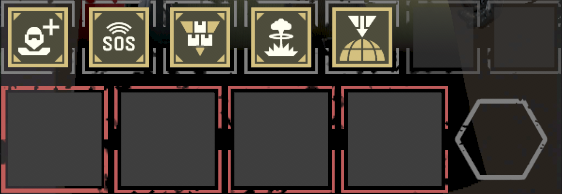
In the loadout selection interface, there is a line of yellow stratagem icons. It shows the mission stratagems all squad members can use (e.g. Reinforcement, Resupply). They vary depending of the main objective but also the optional objectives.
¶ SEAF Artillery
This icon is a yellow version of the Orbital Precision Strike's. It means a SEAF Artillery is part of the optional objectives.
¶ Destroyable with a Hellbomb
What can be deduced from this icon varies depending on the mission and the optional objective displayed on the pre-drop map. It will appear if the mission includes a main objective that can be destroyed by calling in a Hellbomb:
- Command Bunker (Destroy Command Bunkers)
- Destroy Dropship (Sabotage Air Base)
- Fuel Reserve (Sabotage Supply Bases)
- Monolith (Free Colony/Free The City)
- Orbital Cannon (Neutralize Orbital Defenses)
If the main objective is none of the above, the Hellbomb icon will appear if the pre-drop map optional objective is one of the following:
- Enemy Bio-Processors
- Rogue Research Station
If the main objective and the pre-drop map optional objective are neither of the above, then the Hellbomb icon indicates that you will have at least one of these optional objectives:
-
Anti-Air Emplacement
-
Detector Tower
-
Gunship Facility
-
Mortar Emplacement
-
Shreiker Nest
-
Stratagem Jammer
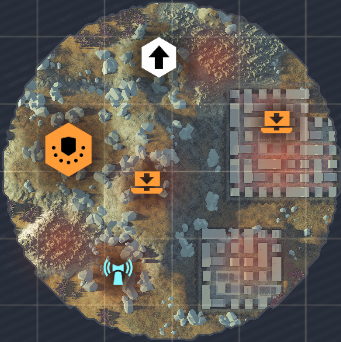
¶ Map Objectives
There are 5 optional objectives which are displayed on the map pre-drop. These are all mutually exclusive with each other (only one per map). 3 are available for both Automatons and Terminids (Rogue Research Station, Terminate Illegal Broadcast, Upload Escape Pod Data) while 2 are faction exclusive (Retrieve Mutant Larva, Enemy Bio-Processors).
The best map objectives are the Rogue Research Station and Terminate Illegal Broadcast, followed by Enemy Bio-Processors.
¶ Enemy Bio-Processors ( Automatons only)
Variants: N/A
Theoretical Minimum: 2s
Actual minimum: 5s
Effect on gameplay for completing: None
¶ Retrieve Mutant Larva ( Terminids only)
Variants: N/A
Theoretical Minimum: 10s + travel time (variable and may coincide with other travel)
Actual minimum: 10s + travel time (variable and may coincide with other travel)
Effect on gameplay for completing: Terminids will aggro onto the position of the larva and you have to drop your backpack to carry it
Useful effect for speedrun?: Usually detrimental, however it's possible it could be used to bait enemies
¶ Rogue Research Station
Variants: N/A
Theoretical Minimum: 2s
Actual minimum: 10s
Effect on gameplay for completing: None
¶ Terminate Illegal Broadcast
Variants: N/A
Theoretical Minimum: 1s
Actual minimum: 1s
Effect on gameplay for completing: None
¶ Upload Escape Pod Data
Variants: N/A
Theoretical Minimum: 40s
Actual minimum: 41s
Effect on gameplay for completing: None
¶ Cross-faction Optional Objectives
Other than the map objectives, there are 2 optional objectives available for both Automatons and Terminids: Lidar Station and SEAF Artillery.
Both of them are quite slow, however the Lidar is useful during the scouting phase of a pre-scouted or blind run. SEAF Artillery can save time later on against certain optional objectives, but it's also very slow to complete.
¶ Lidar Station
Variants: Close Terminal, Far Terminal
Close Terminal:
- Theoretical Minimum: 41s (if already aligned)
- Actual minimum: 44s + rotation (up to 10s if 180 degrees)
Far Terminal:
- Theoretical Minimum: 41s (if already aligned)
- Actual minimum: 47s + rotation (up to 10s if 180 degrees)
Effect on gameplay for completing: All remaining optional objectives and POIs are marked on map
Useful effect for speedrun?: No, unless the run is blind
¶ SEAF Artillery
Variants: Single ring with ammo dugout, double ring. Single ring is faster because shells are closer together
Theoretical Minimum: 5s for terminal, but shell placement is random and can take a lot of time to move
Actual minimum: Varies depending on shell placement, around 1:20 usually, but can go as low as a little under 1m with optimal shell placement on the single ring
Effect on gameplay for completing: Access to the shells loaded into the artillery as stratagems which are unaffected by jammers, ion storms, or destroyer leaving orbit
Useful effect for speedrun?: Yes, lets you destroy objectives with mini nuke unable to be destroyed by red stratagems (Gunship Facility, Orbital Cannon, Fuel Reserve). Lets you destroy Stratagem Jammers without having to deactivate them. Provides other means of quickly clearing other optionals without having to bring certain red stratagems
¶ Automatons only
¶ Anti-Air Emplacement
Variants: 2 AA guns, 3 AA guns
2 AA guns:
- Theoretical Minimum: 4s
- Actual minimum: 6s
3 AA guns:
- Theoretical Minimum: 6s
- Actual minimum: 8s
Effect on gameplay for completing: Eagle stratagems are un-jammed within the 150m radius
Useful effect for speedrun?: Yes if you need your Eagles within the radius to complete an objective, otherwise no
¶ Detector Tower
Variants: N/A
Theoretical Minimum: 2s
Actual minimum: 5s
Effect on gameplay for completing: No bot drops called by the Tower
Useful effect for speedrun?: No, unless tower is in a very inconvenient location (you can usually simply avoid its vision radius)
¶ Gunship Facility
Variants: Single facility, Double facility
Single facility:
- Theoretical Minimum: 18s (Hellbomb) OR 2s (Mini Nuke, SAM Site direct hit or Portable Hellbomb)
- Actual minimum: 25s
Double facility:
- Theoretical Minimum: 18s (hellbomb) OR 2s (Mini Nuke, SAM Site direct hit or Portable Hellbomb)
- Actual minimum: 30s
Effect on gameplay for completing: Facilities no longer spawns gunships that insta lock on your position within 150m radius
Useful effect for speedrun?: Yes, gunships are extremely threatening and can slow you down a lot of fighting them, especially the ones from fabricators which automatically know where you are
¶ Intercept Convoy
Variants: N/A
Theoretical Minimum: 20s (4 Portable Hellbombs)
Actual minimum: 240s (Anti-Tank Emplacement)
Effect on gameplay for completing: Stratagem codes are back to normal and far less danger near the convoy
Useful effect for speedrun?: Yes, stops the scrambled stratagem effect and removes a run killer wall
¶ Mortar Emplacement
Variants: Double mortar, Triple mortar
Double mortar:
- Theoretical Minimum: 4s
- Actual minimum: 6s
Triple mortar:
- Theoretical Minimum: 6s
- Actual minimum: 20s
Effect on gameplay for completing: End to mortar ragdolling, mission control shutting the hell up
Useful effect for speedrun?: Only if mortars are positioned so that they can ragdoll you on objectives
¶ SEAF SAM Site
Variants: N/A
Theoretical Minimum: 30s
Actual minimum: 35s
Effect on gameplay for completing: SAM will auto target enemy gunships and drop-ships/warp ships
Useful effect for speedrun?: Yes, especially on maps with gunship patrols or on missions such as Conduct Geological Survey, Free Colony or Spread Democracy. Can also assist with Gunship Facility.
The SAM missile is extremely powerful and will kill/demolish any objective or enemy caught in the blast, although it's difficult to trigger reliably except vs. enemies in drop-ships or the Gunship Facility when a gunship flies behind it
¶ Stratagem Jammer
Variants: N/A
Theoretical Minimum: 22s (terminal + stratagem toss)
Actual minimum: 33s
Effect on gameplay for completing: Stratagems are un-jammed within the 150m radius
Useful effect for speedrun?: YES, sometimes mandatory to complete certain optional or main objectives (it blocks mission-critical stratagems as well). It's the only "optional" objective that isn't actually optional in a lot of circumstances
¶ Terminid only
¶ Shrieker Nest
Variants: Double Tower, Triple Tower
Double Tower:
- Theoretical Minimum: 12s
- Actual minimum: 12s
Triple Tower:
- Theoretical Minimum: 18s
- Actual minimum: 18s
Effect on gameplay for completing: Shrieker towers no longer spawn Shriekers
Useful effect for speedrun?: Yes, if Shriekers are aggroing bugs or harassing you
¶ Spore Spewer
Variants: N/A
Theoretical Minimum: 3s
Actual minimum: 3s
Effect on gameplay for completing: Spore cloud clears up around spewer, improving vision
Useful effect for speedrun?: Yes, it's hard to play when you can't see very well
¶ Stalker Lair
Variants: Single Hole, Double Hole
Single Hole:
- Theoretical Minimum: 2s
- Actual minimum: 8s
Double Hole:
- Theoretical Minimum: 4s
- Actual minimum: 10s
Effect on gameplay for completing: Bug Holes no longer spawn Stalkers
Useful effect for speedrun?: Yes, Stalkers are threatening and can slow you down a lot having to fighting them
¶ Illuminate only
¶ Cognitive Disrupter
Variants: N/A
Theoretical Minimum: 4s
Actual minimum: 8s
Effect on gameplay for completing: Stratagem codes are back to normal
Useful effect for speedrun?: Yes, typing in codes fast is hard when they are random
¶ Purge Illuminate
Variants: N/A
Theoretical Minimum: RNG
Actual minimum: RNG
Effect on gameplay for completing: None
Useful effect for speedrun?: No, However for 100% you can not control when this is completed its pure RNG when you get enough spawns
¶ Credits
Canis and Rose for summarising optional objectives information.
Jaesa for updating the page with new info and formatting.